
Crafting is something I enjoy doing, and for a while, it took a backseat to my travels, but thanks to my new Cricut Explore Air 2, it’s at the forefront once again. Here’s why I love my Cricut Explore Air 2!
For as long as I can remember, I’ve always enjoyed getting hands-on and creating unique items that I can either use as a display in my home, use for myself, or give as gifts. I remember when I saw my very first Cricut commercial on TV. They were creating paper crafts as decoration for a party, and I knew that I had to own one, and that’s precisely what I did.
When I first got it, I created everything under the sun, because it was so much fun. Back then, the Cricut machine wasn’t as easy to use as it is now. Now it’s very intuitive, and you simply can’t go wrong. My original maker broke after many years of usage, and now I currently own the new Cricut Explore Air 2, and I couldn’t be more ecstatic. So why do I love my Cricut machine?
Let me count the ways!

1. It is Portable
I couldn’t decide if this should be my number one reason or my number two, as they both come in quite close, but this won out. I love the portability or anything that I can move about or take with me with ease. The fact that all I need is my phone, tablet, or computer with Cricut Design Space and a Bluetooth connection, and I’m able to craft anywhere. That means that I can take it to a friend’s house and we can design beautiful works of art together.
2. It’s Simple to Use with Cricut Design Space
I’m not kidding when I say that the Cricut Explore Air 2 is easy to use. With a few simple steps, you’ll be on your way to creating your own designs. Best of all, it guides you through everything so that you don’t have to worry about messing up. With my old Cricut machine, I used to have to use cartridges, which I still own, but with Cricut Design Space, that’s no longer needed. There are hundreds of fonts, graphics, and even ready to make projects that you can design.

3. It Allows You to be Creative
Have you ever seen something in a store and thought, “I could make that,” if only you had the tools and supplies. With a Cricut machine, you literally can make it. The Cricut Explore Air 2 can not only cut paper but can cut more than 100 materials, that includes fabric, faux leather, cork, you name it. With materials such as Infusible Ink, Iron-Ons, and Vinyl, you’re no longer limited to cardstock.
4. It Also Allows You to be Unique
Gone are the days of purchasing items that your next-door neighbor or a best friend owns. Now you can create your own designs and be unique. Think t-shirts, totes, coasters, or even home decor. I created my very own thanksgiving tees for Thanksgiving and holiday totes that we handed out to the teachers with a gift. Guess what? No-one has one like it, and that’s exactly how we like it.

5. The Only Thing Holding You Back is Your Imagination
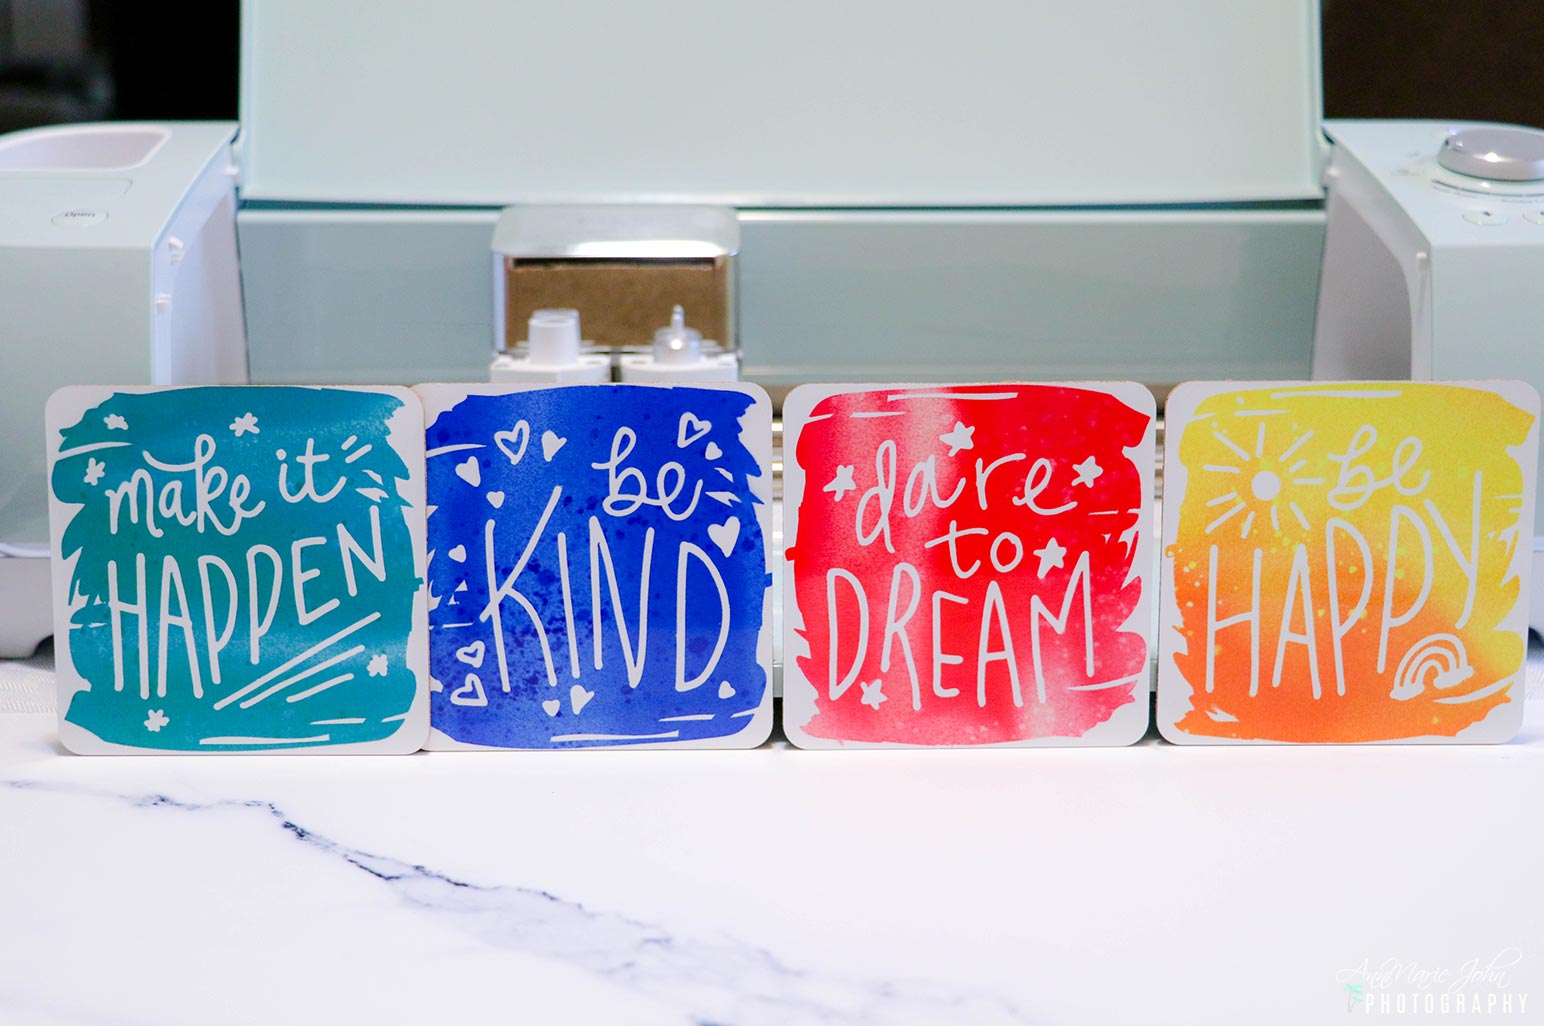
There’s a saying, “With a little imagination, anything is possible,” and with the Cricut machine and Cricut Design Space, the only thing holding you back is your imagination. For example, check out these awesome motivational tile coasters that I was able to make with my Cricut Explore Air 2 and Infusible Ink sheets. Not only were they simple to create, but turned out amazingly well too. If I can do these, so can you.

Motivational Coasters
Supplies Needed
Cricut Explore Air 2
Green StandardGrip Cricut Mat
Cricut Infusible Ink Transfer Sheet
Cricut Infusible Ink Ceramic Coasters
EasyPress 2
EasyPress 2 Mat
White cardstock
Butcher paper (comes with your transfer sheets)

Steps for Infusible Ink
Make sure to read about and follow the directions for Cricut Infusible Ink thoroughly before starting your project. Working with Infusible Ink is different than other Cricut materials. You can find all the info about Infusible Inks via the Cricut website.
Directions
1. Start by figuring out which design you’ll use. If you’re making your own design, the square coasters are 3.75″ x 3.75″. You can search for designs in Cricut Design Space by searching “Coaster.” The designs there are correctly sized. If you choose to make your own designs, make sure to size them appropriately.

2. Once you have your designs picked out and sized correctly (if needed), click Make It at the top right corner of Design Space. When you get to the prepare screen, make sure to MIRROR your images. If you have multiple colors, you’ll need to mirror each one individually.
3. Make sure your dial on your Cricut machine is turned to custom and choose Infusible Ink from the make it screen for your material.
4. To cut your Infusible Ink sheets, you’ll place the liner side down and color side up on a green cutting mat. A Cricut Bayer comes in handy for helping to smooth out your Infusible Ink Sheets

5. Insert into your machine and cut.
6. Once your design is done with the cutting, you’ll need to weed it. I cut the image off the sheet and then weed it.
7. Weeding Infusible Ink is different from other Cricut materials like Iron-on. You will not use any tools to weed your design. You’ll only be using your hands. To weed, you’ll bend the sheet back and forth and peel the negative space from the liner. It should peel off easily.

8. Don’t forget to heat up your EasyPress 2! I do this while applying my designs to the coasters. You can find the heat settings via Cricut’s Heat Guide. Follow those steps for proper heat and time. Each type of coaster has different heat settings and times.
9. To apply the designs to your coasters, you’ll want to wipe them off with the little white cloth the coasters come with. This ensures any dust or debris is removed from the coasters.

10. Apply the image with the liner side up and tape the side down with Cricut Heat Resistant Tape. You want to make sure your sheet is down securely, so it doesn’t move while pressing. If your image moves, it can make your design blurry.
11. To press your coasters, you’ll place your EasyPress Mat down. On top of your EasyPress Mat, you’ll lay down a piece of white cardstock. This ensures that your design doesn’t bleed onto your design. Put your coasters on top of the white cardstock. You can press multiple coasters at a time as long as they all fit under the EasyPress. On top of your coasters, place the piece of butcher paper your sheets came with.

12. Press your coasters for the time specified on Cricut’s heat guide.
13. When your time is up, remove your EasyPress and let the coasters sit until cool. They will be very hot, so use caution when handling them.
Once cooled, peel off the tape and Infusible Ink Sheets. Your coasters are all done!

That’s it. You now have some motivational coasters that you created and can be given as gifts, or used at home when you want a little pick me up. And guess what? You created them all by yourself thanks to the Cricut Explore Air 2.
